Sewer Rehab – Pull-in-Place – Ins & Outs
Home /
Sewer Rehab – Pull-in-Place – Ins & Outs

The next sewer line rehabilitation technique we would like to discuss is Pull-in-Place. This is another great option due to its versatility. Of the trenchless methods we are going to discuss in this series this is the only method that not only provides structural support to your pipe but is usually ZERO DIG. This means that you typically do not need to excavate to rehab your sewer line.
Why Pull-in-Place?
This is a great way to rehab your sewer lines, provide structure to your new lines and get the true NO DIG experience. Why do we say NO DIG? If you’ve read our post “Why Trenchless Sewer Line Rehabilitation?” you will see that some methods do require at least a small hole to excavated to allow the equipment access to the sewer line. This method however typically does not require you to dig any holes. We say typically because there is always that one goofy situation that is so rare we hardly run into it, but when we do OH BABY the customer is not happy. So it can happen. Usually though it may require you to open a hole in your sheetrock to access your vent pipe so that the liner can be pulled into place. Alright, wanna know how this method works? Let’s get into in.
Step 1 – Video Inspection
This is going to have to be done with any for of pipe line rehabilitation. A video inspection of your pipe is performed to determine what’s really going on under there. This will also give the plumber an idea as to where he is going to be pulling the liner in place. It’ll tell him where he needs to stop, how many lines tie into the line that you are going to rehab, and how much prep work is going to be involved. This is the first and most important part of any rehabilitation project.
Step 2 – Descale and Cleaning
Like all our rehabilitation methods we need to remove as much as possible from your sewer line before we can proceed. We don’t want to add our material or even just epoxy without getting your sewer line as back to it’s original diameter as possible. This will allow for proper adhesion of our lining material to the walls of the pipe. We remove scale build up caused by mineral deposits in your
water. We get out any foreign objects that could obstruct our pulling our material through your line.
Step 3 – Pull-in-Place
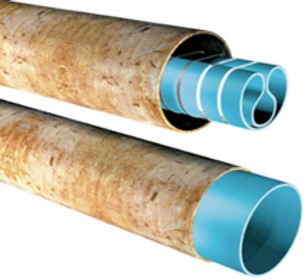
LET’S PULL SOME LINER!!! It starts with us mixing a 2 part resin and using a funnel to pour it into our lining material. The “Liner” is a felt like material on the inside (this is what the resin saturates) and a thin PVC layer on the outside. These 2 parts are what provides the structure of the pipe. Now we gotta get it in the pipe. Our inversion method mentioned earlier uses a pressurized tank to invert the material into your sewer line. This is done a little different. We fish a line through your existing sewer line. One end is attached to out liner that is saturated and wrapped. Then we get the biggest fellas we got to start pulling. We use a camera in the line to determine just how far we need to pull in the pipe till it’s right where we want it. Ok it’s in place, now what?! We huff and we puff and fill a balloon that was inserted into the pipe earlier with air until it pops the tape we wrapped the liner with. Now we wait. Once the liner has had time to harden we pull free the balloon and “Presto, Chango” New Sewer Line!!!
Step 4 – Reinstatements
This can be used on a branch line or on a mainline. If either of these lines has other lines that tie into them then well, we just covered those up. We now use a robotic drill to in your newly lined pipe that articulates to cut out the hole to allow the covered up line to dump into your lined pipe. We can also do what we in the biz call a backside cut. We use a rotary machine equipped with a special head and run it down the line that was covered (or tie in). This will cut open the pipe and sand it smooth from the back side of the liner, hence the name. This is done for each of your tie ins and now your system is fully functioning once again.
Final Thoughts
You may be saying…This option doesn’t necessarily require you to dig a hole so why is it your second best option? Well, one of the main draw backs to this method is that the pipe has to be clean very very well in order to pull the liner into your sewer. The smaller the diameter pipe the more difficult it is to pull the liner. As you have to descale more pipe the larger the chance that you will actually break the pipe more in the process. If you don’t get it perfect then it is very difficult to pull the line in, this is especially so with 2in sewer pipes. Other then that it is an excellent way to rehab your sewer line. It may even be able to be done with out digging up your precious flooring.
Thanks for giving a listening ear. If you have any questions please feel free to leave a comment and I’ll try to answer them as quickly as I can. Our next post is going to cover Pipe Bursting.
Your Friendly Neighborhood Plumber,
Bryan Lopez
Bio Remedies

